How to repair a split female ferrule
Sometimes because of age or misuse or an improper fit, a female ferrule may become split and if not repaired quickly, the split will increase through the length of the section or even completely break the section at the ferrule. It is good practice to inspect your ferrules periodically and especially if the section feels funny or the fit isn’t normal.
The sleeve ferrule (tip over butt type) is more difficult to see, whereas the spigot (separate fiberglass or graphite internal type) will show more readily as the wear gap between the sections will decrease or even disappear.
These simple steps go through the process of repairing a split ferrule:
Step 1: Carefully cut off and remove the ferrule wrap or guide wrap that covers the split. The wrapped area around the split will show cracking or some discoloration in the finish.
Step 2: Clean the area around the ferrule to remove any old varnish, epoxy, etc.
Step 3: Inspect the split to see if it can be repaired or if the section needs to be replaced.
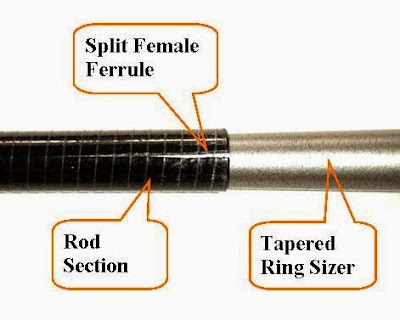
Step 4: Carefully insert a dowel or tapered file to slightly open the split. The image below shows how I open the split by using a tapered ring sizer, which also comes in very handy for other jobs.
Step 5: Insert ‘Super Glue’ or epoxy adhesive into the split making sure that the glue you use completely coats all the edges.
Step 6: Remove your dowel or ring sizer and let the split close together. Make sure that the edges of the split line up with one another and completely close.
Step 7: Clean any excess glue from the outside and the inside of the section (I use a cotton swab with denatured alcohol to remove any excess glue from inside the blank) and put aside to dry for at least overnight. I will wrap some masking tape around the ferrule end to ensure that the split will stayed closed.
Step 8: Reinsert your dowel or tapered tool to double check that the split is repaired and that there are no other splits. Sometimes when a female ferrule starts to split, there may be more than one.
Step 9: Test the fit of the sections to make sure that they are fitting together properly. You may have to do a bit of light sanding inside and out to make sure the repair is smooth.
Step 10: Re-wrap the ferrule (and or guide) and apply your rod finish.
These repair steps apply to both fiberglass or graphite rods. Take your time and let the glue do it’s job and if you are faced with multiple splits or even a missing piece of glass or carbon, I recommend that you contact the manufacturer to get a replacement section or find a rod builder that can do this kind of repair.
1 thought on “How To Repair A Split Female Ferrule”