How to care for and use a Digital Caliper
A digital caliper is a precision tool that can be used to accurately determine the dimensions of most objects. As with any precision instrument, proper usage and care is very important. Following the suggestions below will maximise the user’s satisfaction with the caliper, increasing the accuracy of the measurement and lengthening the useful life of the tool. Before using the caliper, unlock the top thumbscrew and clean the jaws by sliding your finger over both surfaces of the jaws. Pay special attention to the jaw tips. Dirt, grease and small particles tend to accumulate here. This will make sure that nothing affects the setting of the zero position. After cleaning, close the jaws together and then press the zero button to set the zero point.
When measuring round objects such as rod blanks, don’t rotate the blank in the jaws while applying pressure. This will mark your blank. Open the jaws, rotate the blank and then close the jaws to make your next measurement. Use the thickest part of the jaws to make your measurement whenever possible. Using the knife-edges jaw tips may cause a ’tilt’ and result in an inaccurate measurement.
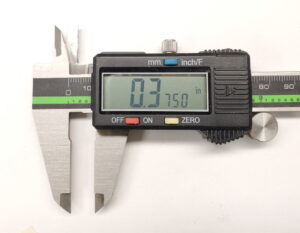
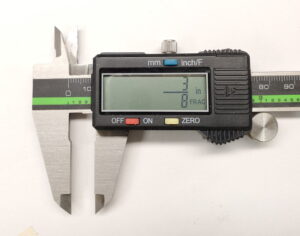
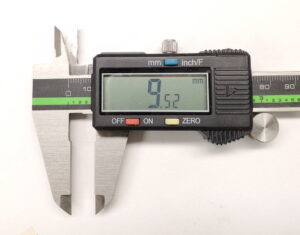
Digital calipers are becoming more and more popular for rod builders due to the ease of operation, multifunction and precise measuring. They are very simple to read and can easily switch from inches to fractions to millimeters by pressing the button. When in the ‘inches’ mode the far left number before the decimal point is whole inches. The first number to the right of the decimal is tenths of inches. The second number to the right of the decimal is hundreths of inches and the third number to the right of the decimal is thousandths of inches. If you see a small fourth number 5, that indicates on half of a thousandths. The second mode is fractions of an inch and when in the third or millimter mode again the number of the left of the decimal are whole millimeters, the first number to the right of the decimal is tenths of millimetes; the second number to the right is hundredths of millimeters.
The pictures below shows the multifunction feature of this caliper: .3750 then 3/8″ fraction and then 9.52 millimeters:
Why do we need the multifunction feature of this caliper? In custom rod building we use thousand of an inch (to measure the butt diameter or the winding check diameter; we use fractions such as 4/64 to measure blank tip for tip tops and we also use millimeters to size guides, checks and reel seats. The three modes come in very handy!
Pressing the OFF/ON button once will cause the display to turn on. Also, just sliding the scale will activate the display. Once it is ‘on’, pressing the OFF/ON button again will zero the value regardless of the position of the slide. From that reference point any movement will display the difference: sliding to the left will display a negative value and sliding to the right will display a positive figure. This feature makes it convenient to make comparison between two measurements. The ‘mm/inch/F’ button toggles between inch, fraction and metric and display. Note that when a caliper is turned on it will always display in whatever mode it was in before it was turned off. The OFF/ON button simply turns the display off. Also, the caliper will turn off automatically after a period of no activity to save battery life.
Don’t use the calipers as anything but a measuring tool. No prying or dropping as this will result in bent tips and will basically destroy the caliper. Do not take the caliper apart except for the battery cover and battery.
We hope this helps and will make your blank and component measuring simpler and more precise. Custom Fly Rod Crafters offer this unique caliper for only $29.95.